Brief Update

I haven’t had much time to work on the layout in the past couple days, but I did manage to get the wall built that will separate the Cordova Dock (lower deck) and the Kennecott mine facilities (upper deck) from the workshop.  I also demolished the old helix, as I don’t plan to reuse it in its current form for the Chitina helix.

I also removed most of the screws holding down the existing part of the new Cordova yard.  My plan is to lift the plywood and track structure out whole and replace the benchwork underneath to match new standards.  Then I’ll install risers and cleats, cut down the plywood around the yard, and mount it back in place.  That’ll allow me to remove all of the heavy 2×4 benchwork under it – it’s all being replaced with 1×4 open grid – as well as what’s left of the old staging yard and the old electrical cabinet.

Unfortunately, I have to head for Indianapolis next week, so there won’t be much progress for another 10 days or so.  Then, when I get back, we’re firmly into fall photo charter season here in Colorado, so many of my weekends will be consumed out having fun on the narrow gauge.  As a result, progress may be a bit slow for the next two months.  I’ll try to fill the gaps with historical posts, or posts about layout standards and such things I’ve already decided upon.

LED Lighting Rethought

So last night, as I was trying out various LED strip configurations, I was trying to match my old fluorescent tubes in terms of illumination without regard to overall power consumption, cost, or anything else.

Today, sitting at work, reality smacked me upside the head.  Each deck has approximately 110 feet of linear run, so 220 feet of lighting for the whole layout.  Assuming four strips of LEDs going strong for main lighting, that works out to 4.8A/4ft, or ~1.2A per foot.  That’s 264 AMPS of 12 volt power, or 3.2kW.  Yikes!  Given at a 20A house circuit can only source 2.4kW under ideal conditions, that’s probably 2-3 house circuits just to light the layout. (Remember, any power supply isn’t going to be 100% efficient.  In fact, 75% would probably be a good day.  Then, unless it’s power factor corrected, that’s going to get even worse.)  Given that my breaker box is buried in a finished wall, running new circuits would be painful.

After some tinkering when I got home, I came to the conclusion that two LED strips is probably “good enough”.  That’s only 1.6kW, which even assuming crappy power supplies should easily fit on existing circuits I can tap from the basement.  So, I ordered enough LED strip to complete the layout this afternoon…

Now off to continuing to demolish the old layout and clean out the basement for new construction.

CRNW LED Lighting

My old Canadian Arctic Railway layout was planned to use dual 4′ T8 fluorescent fixtures mounted above each level.  I’d never been particularly happy with that solution, since even the decent-quality electronic ballasts would buzz slightly, and the fixtures were completely un-dimmable.  Plus, I always had some residual concerns about UV light from the bulbs damaging scenery.

I’ve been convinced for some time that LED strip lights were the way of the future.  Small, silent, efficient, easily controlled (they’re only 12 volts!), and available in a wide variety of colors, strip lighting seems to promise massive improvements over under-layout fluorescent fixtures.  The downside is the need for very large 12V power supplies and – until recently – the pure cost of it.  Fortunately, with recent advances in LEDs and direct access to Chinese vendors via eBay and Alibaba, those two concerns have largely gone away.

In addition, the infinite dimmability of LEDs and the variety of available colors opened up the possibility of something I’ve wanted to try for a long time – modeling the day/night cycle!  The basic idea would be to have the layout lighting adjust the intensity and color blend based on the fast clocks, so that as the day progresses, dawn grows into mid-day, which fades to afternoon and the “golden hour”, which gives way to the “blue hour” and then eventually night.  With the right mix of colors and some simple power controllers attached to the MRBus layout network, such a thing should be relatively simple.

I ordered three 5 meter spools of 5050 (5.0mm by 5.0mm component) LED strips from China via eBay (my secret source…): one warm white (3200K), one cool white (6500K), and one blue.  After two weeks of waiting on the proverbial slow boat from China, they arrived this afternoon.  I wasted no time getting them downstairs, finding a suitable 4 ft. board (same as the fluorescent fixture), and cutting off strips to test.

I finally settled on 3 warm white and 1 cool white strip, when lit together at 12V, gave me similar lighting to the old tubes.  One cool white and one blue strip, lit at about 10% power, gave me a reasonable “night”.  No, it’s not as dark as a real night, but it’s a decent approximation for my operators.

No mix I could find, however, gave me a suitable sunrise or sunset color, so I’ve ordered another strip of 5050 RGB LEDs.  I’m hoping that by using the warm and cool white strips as the “bulk” light, and then “flavoring” it slightly with color from the RGB strip, I can get satisfactory colors for all times of day.  More to come once those LEDs get here…

I’ve included pictures of this evening’s test below.

Also, as a teaser, the first part of my CR&NW’s roster showed up today…  Meet the 600s, a set of 6 SD60M three-window units that will eventually be numbered 600-605.  (Yes, there’s a spare shell there, just in case I’m not as good with the ol’ airbrush as I used to be.)  Obviously with the real CRNW calling it quits in 1938, they never had diesels.  However, as I’ve mentioned, mine will be set in the present day.  In my world, the SD60Ms showed up on the property in 1990 to replace the aging fleet of SD9s that had originally replaced steam in the 1950s.  But more on my fictional modern day roster another day…


And Construction / Destruction Starts…

Here’s a last look at the start of the Canadian Arctic Railway, my fictional bridge line from Fort Nelson, BC, to Anchorage, AK.  I started planning this line almost a decade ago, and began construction shortly after buying this house with my wife.  Then she became my ex in 2008, and the railroad went into an seven year holding pattern.

As of tonight, CR&NW plans in hand, I started tearing down pieces that aren’t staying in the new design.   The helix came out, and I’m in the process of removing the under-level staging yard.  (The staging yard is getting a new life as a testbed for some Iowa Scaled Engineering projects, so it’s still around, just shorter.)

Tomorrow or Sunday, I’ll remove the upper deck and extend the wall framing out through the area the helix once occupied.  Then comes the task of replacing the old heavy upper framework with a new, lighter open grid system.  The bottom through this section will likely remain the same – Fort Nelson is being rebuilt as the main Cordova, AK, yard.  All new construction on the bottom, however, will follow a similar lightweight construction method.  I’ll also be installing a valence above the upper deck, and shelving below the lower deck.

And so the journey begins…

Draft Track Plan

I started off this layout thinking I’d step into the 21st century and embrace CAD tools for track layout.  I’ve often been described by my friends as “CAD-tarded”, because of my long-standing and complete inability to use CAD tools.  I don’t know why, but the tools and I spend more time fighting each other than getting work done.  I guess my brain isn’t wired that way.  But, I figured with a fresh new project, this was the time to start trying again to switch from my old ways.

Wrong.

I grabbed demo versions of many of the popular packages (CADrail, 3rd PlanIt, etc.), or full versions, in the case of the free XTrkCad, and wound up beating my head against them for a full day before giving up.  I just couldn’t get things to work, and the frustration was driving my creativity level to a new low. Well, there’s a Saturday I’ll never get back.

So on Sunday, I pulled out my 17×22 quadrille pad, templates, compasses, rulers, and drafting pencil.  I was so much happier.  The creativity returned.  I spent the entire Sunday drawing, and didn’t even realize that I’d been at it for 14 hours until I looked up at the clock at 2am.  Oops.

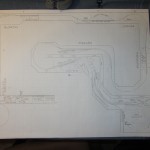
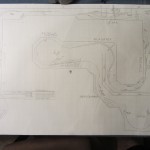
Here’s my initial sketches of a track plan, as captured by my little camera because I haven’t yet scanned them (they’re 17″x22″, a bit bigger than my scanner bed, so it’s going to take some work).  Thoughts, comments?

My initial sketch of the upper deck track plan, from Chitina to Kennecott.  I realized after I took the picture that I'd forgotten to relabel a few things after moving things around.  Chitina is in the lower right, and Kennicott is on the peninsula on the lower left.

Upper Deck

My initial sketch trackplan of the CRNW's lower deck, from Cordova up to Abercrombie Canyon

Lower Deck

Welcome to the CR&NW!

After ten years of making absolutely no progress on my model railroad and switching potential prototypes every year or two, I’ve come full circle to what I had originally planned to model – the long-abandoned Copper River & Northwestern Railway of southeastern Alaska.

The real CR&NW was a copper hauler from the mines at Kennicott, AK, to tidewater at Cordova.  Completed in 1911, the line only lasted a mere 27 years before the Depression and the depletion of high grade ore took its toll.  For its time, it was a spectacular feat of engineering, crossing waters between active glaciers, spanning deep ravines, and dealing with the extremes of climate for which inner Alaska is reknown.

I’m not much of a model steam guy, so mine will be a proto-freelance version where the ore body remained viable and mining continued to present day.   I’m currently targeting a modeling era of September 2012, though that may slide forward or back a few years.  The line will stick closely to the actual prototype, following the route from Cordova up through Miles Glacier, the Copper River canyons, Chitina, and over to Kennicott.   That said, there will be a few concessions to “because I want to”, such as a possible completed Katalla Branch.

The N scale layout will fit in a 16×22 space in my basement, filling two full decks and a possible partial third.  As of the end of July 2013, I have a track plan semi-finalized, and I’ve started clearing out space and tearing down the old layout.  I’ll post progress, or non-progress, as it gets made.

My current timeline calls for benchwork to be complete by January 1, and hopefully track to be complete by mid-Februrary.  Electrical should follow along closely behind, hopefully by the end of March. Then I plan to run for a few months, hammering out any gremlins in the trackwork and getting it down to bulletproof.

After that, I plan to step out into undiscovered territory, at least for me – scenery.  My layouts always hang up in control systems, because, well, I’m an electronics kind of guy.  But I swear, I can change.  If I have to.  I guess.  (With my apologies to Red Green…)